Shopware 6 Development on Kubernetes
Tomasz GajewskiReading Time: 8 minutes
Why Kubernetes and Shopware 6?
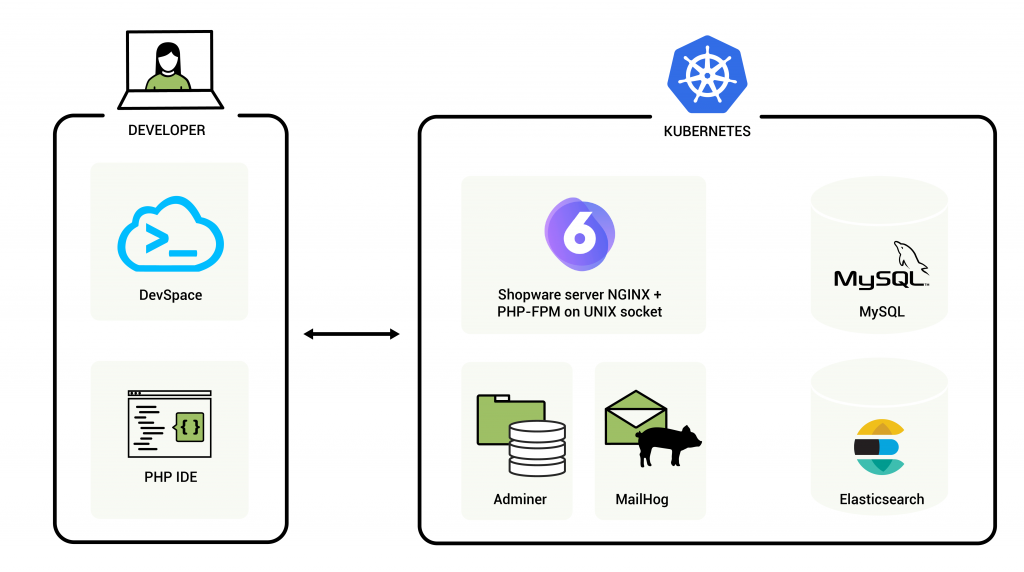
Deploying an eCommerce platform like Shopware to a Kubernetes cluster has undoubted advantages. The most important are high scalability, reliability, automated deployments. Shopware is not a standalone PHP application but also uses MySQL database, Elasticsearch, optionally Redis, and Varnish. Therefore, it is crucial to have the development environment as similar to production as possible. Then the risk of bugs related to differences in configuration between the environments is much lower. When the complexity of the software stack increases, its management can be more efficient thanks to Kubernetes.
This article explains how to deploy a Shopware 6 platform to a cluster with Kubernetes to develop and debug directly in this cluster.
What you need to start
The mandatory element is, of course, a Kubernetes cluster. The best choice for development or testing purposes is Minikube or MicroK8s. Both are equally easy to set up for a single-node cluster. While minikube installs Kubernetes in a local virtual machine, MicroK8s can be installed either locally or on a remote machine.
You can find the complete setup presented here in Shopware 6 Development on Kubernetes repository on GitHub. Minimal requirements for the local cluster are 8 GB RAM and 40 GB free disk space, dual-core CPU, Linux, or Mac OS. 16 GB of RAM is recommended, though.
To create the local minikube run:
./kubernetes/bin/create_minikube.shDevSpace is a good solution for build automation, reverse port forwarding for Xdebug, and synchronizing your code with the running Shopware instances running inside the cluster. Kustomize will be very useful for the configuration management.

How to prepare Shopware 6 container image?
First, let's create a docker image based on NGINX and PHP-FPM and build Shopware 6 with Composer. Thankfully shopware/production template is available on Packagist. We’ll do that by executing the following command:
composer create-project --no-interaction -- shopware/production .It will download the project together with the dependencies.
Here is an example of the Dockerfile. This is a simpler version which doesn't include administration-watch and storefront-watch servers. The complete example you will find in the repository.
FROM webdevops/php-nginx-dev:7.4

ENV COMPOSER_HOME=/.composer
ENV NPM_CONFIG_CACHE=/.npm
ENV WEB_DOCUMENT_ROOT=/app/public
ENV PROJECT_ROOT=/app
ARG USER_ID=1000
ARG GROUP_ID=1000

RUN mkdir -p /usr/share/man/man1 \
    && curl -sL https://deb.nodesource.com/setup_12.x | bash \
    && mkdir -p ${NPM_CONFIG_CACHE} \
    && mkdir ${COMPOSER_HOME} \
    && chown ${USER_ID}:${GROUP_ID} ${COMPOSER_HOME} \
    && apt-install software-properties-common dirmngr nodejs libicu-dev graphviz vim gnupg2 \
    && npm i npm -g \
    && npm i forever -g \
    && chown -R ${USER_ID}:${GROUP_ID} ${NPM_CONFIG_CACHE} \
    && pecl install pcov-1.0.6 \
    && docker-php-ext-enable pcov \
    && apt-key adv --fetch-keys 'https://mariadb.org/mariadb_release_signing_key.asc' \
    && add-apt-repository 'deb [arch=amd64] https://ftp.icm.edu.pl/pub/unix/database/mariadb/repo/10.5/debian buster main' \
    && apt-install mariadb-client

# here are custom php.ini settings
COPY config/php/php-config.ini /usr/local/etc/php/conf.d/zzz-shopware.ini
# shopware specific NGINX settings
COPY config/nginx/shopware.conf /opt/docker/etc/nginx/vhost.conf
# NGINX PHP related settings
COPY config/nginx/php.conf /opt/docker/etc/nginx/conf.d/10-php.conf
# Shopware specific PHP-FPM settings
COPY config/php/php-fpm.conf /usr/local/etc/php-fpm.d/zzz-shopware.conf

WORKDIR ${PROJECT_ROOT}
USER application

RUN composer create-project --no-interaction -- shopware/production . "${SHOPWARE_VERSION}"
RUN composer install --no-interaction --optimize-autoloader --no-suggest
# all custom plugins can be initially copied during the build
COPY --chown=${USER_ID}:${GROUP_ID} shopware/custom/plugins custom/plugins
# this script will be useful by the init script to wait until the database is ready
COPY --chown=${USER_ID}:${GROUP_ID} config/shopware/wait-for-it.sh bin/wait-for-it.sh
# the init script which prepares Shopware for incoming connections
COPY --chown=${USER_ID}:${GROUP_ID} config/shopware/shopware-init.sh bin/shopware-init.sh

ENTRYPOINT ["/entrypoint"]
CMD ["supervisord"]
The base image is webdevops/php-nginx-dev. It already comes with all the basic components that Shopware 6 requires - NGINX, PHP-FPM with Xdebug.
The build should run both the storefront and the administration build scripts. However, the original bin/build-administration.sh or bin/build-storefront.sh will return an error because they use bin/console, which requires an existing connection to the database.
Let's extract the npm build commands as a workaround.
The administration application build requires the plugins.json file, which can be initially generated by:
bin/console bundle:dumpAs mentioned, the console doesn't work without a valid database connection. Thus, for the very first time, you can download the file from the repository.
Copy plugins.json to app/var directory. Ensure that every build will copy it there not to have to generate this file every time.
COPY --chown=${USER_ID}:${GROUP_ID} config/shopware/plugins.json var/plugins.json...
# init storefront and administration
RUN npm clean-install --prefix vendor/shopware/administration/Resources/app/administration
RUN npm clean-install --prefix vendor/shopware/storefront/Resources/app/storefront/
RUN node vendor/shopware/storefront/Resources/app/storefront/copy-to-vendor.js
# build storefront
RUN npm --prefix vendor/shopware/storefront/Resources/app/storefront/ run production
# build adminstration
RUN npm run --prefix vendor/shopware/administration/Resources/app/administration/ build
ENTRYPOINT ["/entrypoint"]
CMD ["supervisord"]
# end of DockerfileFinally, let's not forget about the plugins. Copy them to app/custom/plugins.
COPY --chown=${USER_ID}:${GROUP_ID} shopware/custom/plugins custom/pluginsCreate Kubernetes objects
Kubernetes follows a declarative model. It means that the provided objects describe the desired state of your cluster. Most commonly we use YAML files to define manifests which are then transformed into objects applied with kubectl.
Besides the application server (PHP-FPM 7.3 or newer + NGINX), the minimal stack needs to consist of MySQL 5.7 or newer and Elasticsearch. Additionally, to support development, very useful will be Adminer and MailHog.
To deploy stateful applications such as Elasticsearch or MySQL, we should use the StatefulSet type of objects. Deployment type describes the rollout of stateless applications: Shopware app server, Adminer, and MailHog. Both Deployment and StatefulSet will create Pods according to the specification in the manifests.
When you have the Deployments, you need something to expose the ports of the applications (Pods) and make them visible within the cluster. The solution for this are Services.
apiVersion: v1
kind: Service
metadata:
  labels:
    app: app-server
  name: app-server
  namespace: development
spec:
  type: ClusterIP
  ports:
    - name: http-app
      port: 8000
      targetPort: 8000
  selector:
    app: app-server
---
apiVersion: apps/v1
kind: Deployment
metadata:
  labels:
    app: app-server
  name: app-server
  namespace: development
spec:
  replicas: 1
  selector:
    matchLabels:
      app: app-server
  template:
    metadata:
      labels:
        app.network/shopware: "true"
        app: app-server
    spec:
      containers:
        - name: app-server
          image: kiweeteam/shopware6-dev
          imagePullPolicy: IfNotPresent
          envFrom:
            - configMapRef:
                name: env
          ports:
            - containerPort: 8000
          resources: {}
          volumeMounts:
            - mountPath: /tmp
              name: app-server-tmpfs0
            - mountPath: /app/public/media
              name: media
            - mountPath: /app/public/thumbnail
              name: thumbnail
            - mountPath: /app/.env
              subPath: .env
              name: env-file
      restartPolicy: Always
      volumes:
        - emptyDir:
            medium: Memory
          name: app-server-tmpfs0
        - name: media
          persistentVolumeClaim:
            claimName: media
        - name: thumbnail
          persistentVolumeClaim:
            claimName: thumbnail
        - name: env-file
          configMap:
            name: env-file
MySQL Service and Deployment
apiVersion: v1
kind: Service
metadata:
  labels:
    app: db
  name: db
  namespace: development
spec:
  ports:
    - name: mysql
      port: 3306
      targetPort: 3306
  selector:
    app: db
---
apiVersion: apps/v1
kind: StatefulSet
metadata:
  labels:
    app: app-mysql
  name: db
  namespace: development
spec:
  replicas: 1
  serviceName: db
  selector:
    matchLabels:
      app: db
  template:
    metadata:
      labels:
        app.network/db: "true"
        app: db
    spec:
      containers:
        - env:
            - name: MYSQL_DATABASE
              valueFrom:
                configMapKeyRef:
                  name: env
                  key: DB_NAME
            - name: MYSQL_PASSWORD
              valueFrom:
                configMapKeyRef:
                  name: env
                  key: DB_PASSWORD
            - name: MYSQL_ROOT_PASSWORD
              valueFrom:
                configMapKeyRef:
                  name: env
                  key: DB_ROOT_PASSWORD
            - name: MYSQL_USER
              valueFrom:
                configMapKeyRef:
                  name: env
                  key: DB_USER
          image: mysql:8
          name: db
          ports:
            - containerPort: 3306
          volumeMounts:
            - mountPath: /var/lib/mysql
              name: dbdata
      restartPolicy: Always
      volumes:
        - name: dbdata
          persistentVolumeClaim:
            claimName: dbdata
  volumeClaimTemplates:
    - metadata:
        name: dbdata
      spec:
        accessModes:
          - ReadWriteOnce
        resources:
          requests:
            storage: 1Gi
Elasticsearch
Before Elasticsearch, you need to apply ECK (Elastic Cloud on Kubernetes). It contains Custom Resource Definitions required to deploy Elasticsearch clusters or other Elastic apps like Kibana or Filebeat. Otherwise an object of the type Elasticsearch will not be recognized.
kubectl apply -f https://download.elastic.co/downloads/eck/1.3.0/all-in-one.yamlThen Elasticsearch manifest file:
apiVersion: elasticsearch.k8s.elastic.co/v1
kind: Elasticsearch
metadata:
  name: elasticsearch
  namespace: development
spec:
  version: 7.10.1
  nodeSets:
  - name: default
    count: 1
    podTemplate:
      metadata:
        labels:
          app.network/db: "true"
      spec:
        containers:
        - name: elasticsearch
          env:
          - name: ES_JAVA_OPTS
            value: -Xms512m -Xmx512m
    volumeClaimTemplates:
      - metadata:
          name: elasticsearch-data
        spec:
          accessModes:
            - ReadWriteOnce
          resources:
            requests:
              storage: 1Gi
    config:
      node.store.allow_mmap: false
      xpack.security.enabled: false
  http:
    tls:
      selfSignedCertificate:
        disabled: true
    service:
      spec:
        type: ClusterIP
TLS is disabled since there is no intention to expose the search to the public. The only consumer is Shopware.
MailHog
apiVersion: v1
kind: Service
metadata:
  labels:
    app: mailhog
  name: mailhog
  namespace: development
spec:
  ports:
    - name: mailhog
      port: 8025
      targetPort: 8025
    - name: smtp
      port: 1025
      targetPort: 1025
  selector:
    app: mailhog
---
apiVersion: apps/v1
kind: StatefulSet
metadata:
  labels:
    app: mailhog
  name: mailhog
  namespace: development
spec:
  replicas: 1
  serviceName: mailhog
  selector:
    matchLabels:
      app: mailhog
  template:
    metadata:
      labels:
        app.network/mail: "true"
        app: mailhog
    spec:
      containers:
        - image: mailhog/mailhog
          name: mailhog
          ports:
            - containerPort: 8025
            - containerPort: 1025
          resources: {}
      restartPolicy: Always
Persistent volumes
Media files, the database require persistence. Otherwise, the data will be lost after restarting a pod with MySQL, NGINX, or Elasticsearch. This example does dynamic volumes provisioning. Dynamic provisioning creates PersistentVolumes automatically based on PersistentVolumeClaims. StatefulSet objects may have volume claims defined as templates in the section volumeClaimTemplates.
Here's an example for Elasticsearch volume claim template:
...
volumeClaimTemplates:
  - metadata:
      name: elasticsearch-data
    spec:
      accessModes:
        - ReadWriteOnce
      resources:
        requests:
          storage: 1Gi
...
Then we need two more volumes to persist media files (and thumbnails). Since this dev cluster runs only one instance of the Shopware app server, the access mode can be ReadWriteOnce. But for production ideally if it's ReadWriteMany to have the common volume for all replicas.
apiVersion: v1
kind: PersistentVolumeClaim
metadata:
  labels:
    app: media
  name: media
  namespace: development
spec:
  accessModes:
    - ReadWriteOnce
  resources:
    requests:
      storage: 500Mi
---
apiVersion: v1
kind: PersistentVolumeClaim
metadata:
  labels:
    app: thumbnail
  name: thumbnail
  namespace: development
spec:
  accessModes:
    - ReadWriteOnce
  resources:
    requests:
      storage: 500Mi
When creating a minikube cluster, you need to remember to enable two add-ons: default-storageclass and storage-provisioner (create_minikube.sh already does it).
minikube addons enable default-storageclass
minikube addons enable storage-provisioner
For Microk8s, it is:
microk8s enable storageDefining network policies
Network policies are useful to control the network flow in a cluster. We don't want to expose all services to the entire cluster but only to the pods which intend to use them. In this example, we allow MySQL, Elasticsearch, and MailHog to be available to all pods containing the label app.network/shopware: "true".
apiVersion: networking.k8s.io/v1
kind: NetworkPolicy
metadata:
  name: db
  namespace: development
spec:
  podSelector:
    matchLabels:
      app.network/db: "true"
      app.network/mail: "true"
  policyTypes:
  - Egress
  # Allow incoming connections only from the pods with the labels
  # app.network/db: "true", app.network/mail: "true" to the pods
  # containing the label app.network/shopware: "true"
  ingress:
    - from:
        - podSelector:
            matchLabels:
              app.network/shopware: "true"
      ports:
        - protocol: TCP
          port: 3306
        - protocol: TCP
          port: 9200
        - protocol: TCP
          port: 1025
Use Kustomize to compile the configs.
Shopware is a Symfony application that uses parameters defined in environmental variables. The administration dev server additionally requires the parameters in the .env file too. We can use Kustomize to generate the config map, use the variables as environment variables in the running pod, and mount the .env file in a volume.
Here's our sample .env file:
APP_ENV=dev
APP_SECRET=8583a6ff63c5894a3195331701749943
APP_URL=http://localhost:8000
APP_WATCH=true
COMPOSER_HOME=/.composer
DATABASE_URL=mysql://app:app@db:3306/shopware
DB_NAME=shopware
DB_USER=app
DB_PASSWORD=app
DB_ROOT_PASSWORD=root
DEVPORT=8080
GROUP_ID=1000
MAILER_URL=smtp://mailhog:1025
SHOPWARE_ES_ENABLED=1
SHOPWARE_ES_HOSTS=elasticsearch-es-http:9200
SHOPWARE_ES_INDEX_PREFIX=sw
SHOPWARE_ES_INDEXING_ENABLED=1
SHOPWARE_HTTP_CACHE_ENABLED=0
SHOPWARE_HTTP_DEFAULT_TTL=7200
STOREFRONT_PROXY_PORT=9998
USER_ID=1000
PORT=8080
ESLINT_DISABLE=true
Next, add the configMapGenerator section to kustomization.yaml, one for the variables and one for the env file.
configMapGenerator:
  - name: env
    envs:
    - .env
  - name: env-file
    files:
    - .env
The following step is to update the shopware deployment by:
- Adding
spec.template.spec.containers.envFrom[]field.... envFrom: - configMapRef: name: env ... - Creating a volume in
spec.template.spec.volumes[]with the.envfile contents.... volumes: - name: env-file configMap: name: env-file ... - Mounting the volume as an .env file in
spec.template.spec.containers[].volumeMounts;subPath: .envis important to mount .env as a file.... volumeMounts: - mountPath: /app/.env subPath: .env name: env-file ...
Start development with devspace dev command
Initially, you need to configure the following items:
Source files sync between your computer and Kubernetes.
Port forwarding to be able to access the storefront on http://localhost:8000.
Logs streaming to stdout.
DevSpace reads the configuration from the local devspace.yaml file. You can generate this file by running devspace init and providing the path to the Dockerfile.
My recommendation, however, is to use the pre-configured one, specific to this project.
The development section in devspace.yaml is dev. You'll find it in the root of the file.
Files synchronization settings
What’s important here is setting initialSync: preferLocal. The synchronization is bi-directional. That setting ensures that DevSpace does not delete any local files when the initial sync happens.
...
dev:
  sync:
    - labelSelector:
        app: app-server
      excludePaths:
        - .gitignore
        - .gitkeep
        - .git
      initialSync: preferLocal
      localSubPath: ./docker/shopware/custom/plugins
      containerPath: /app/custom/plugins
      namespace: development
      onUpload:
        restartContainer: false
...
In the example above only the folder /app/custom/plugins is synchronized - this is where all custom plugins are saved. There is no need to sync anything else, since all the custom code is in the plugins directory.
Webserver port forwarding
...
dev:
  ports:
    - labelSelector:
        app: app-server
          remotePort: 9003
      forward:
        - port: 8000
          remotePort: 8000
...
Logs output
...
dev:
  logs:
    showLast: 100
    sync: true
    selectors:
      - labelSelector:
          app: app-server
This will find the running Pod by its label, print the last 100 lines of logs initially, and will keep streaming.
Debugging Shopware with Xdebug
The base container image already has the Xdebug PHP module installed, so no further changes are needed here. Just enable reverse forwarding on port 9003 (SSH tunnel).
...
- labelSelector:
    app: app-server
  reverseForward:
    - port: 9003
      remotePort: 9003
The next part is installing the Xdebug chrome extension or adding Xdebug bookmarklets to your browser's toolbar. Just generate them and drag them to the toolbar.
Finally, start the dev mode by executing: devspace dev. You should see the following message in the console:
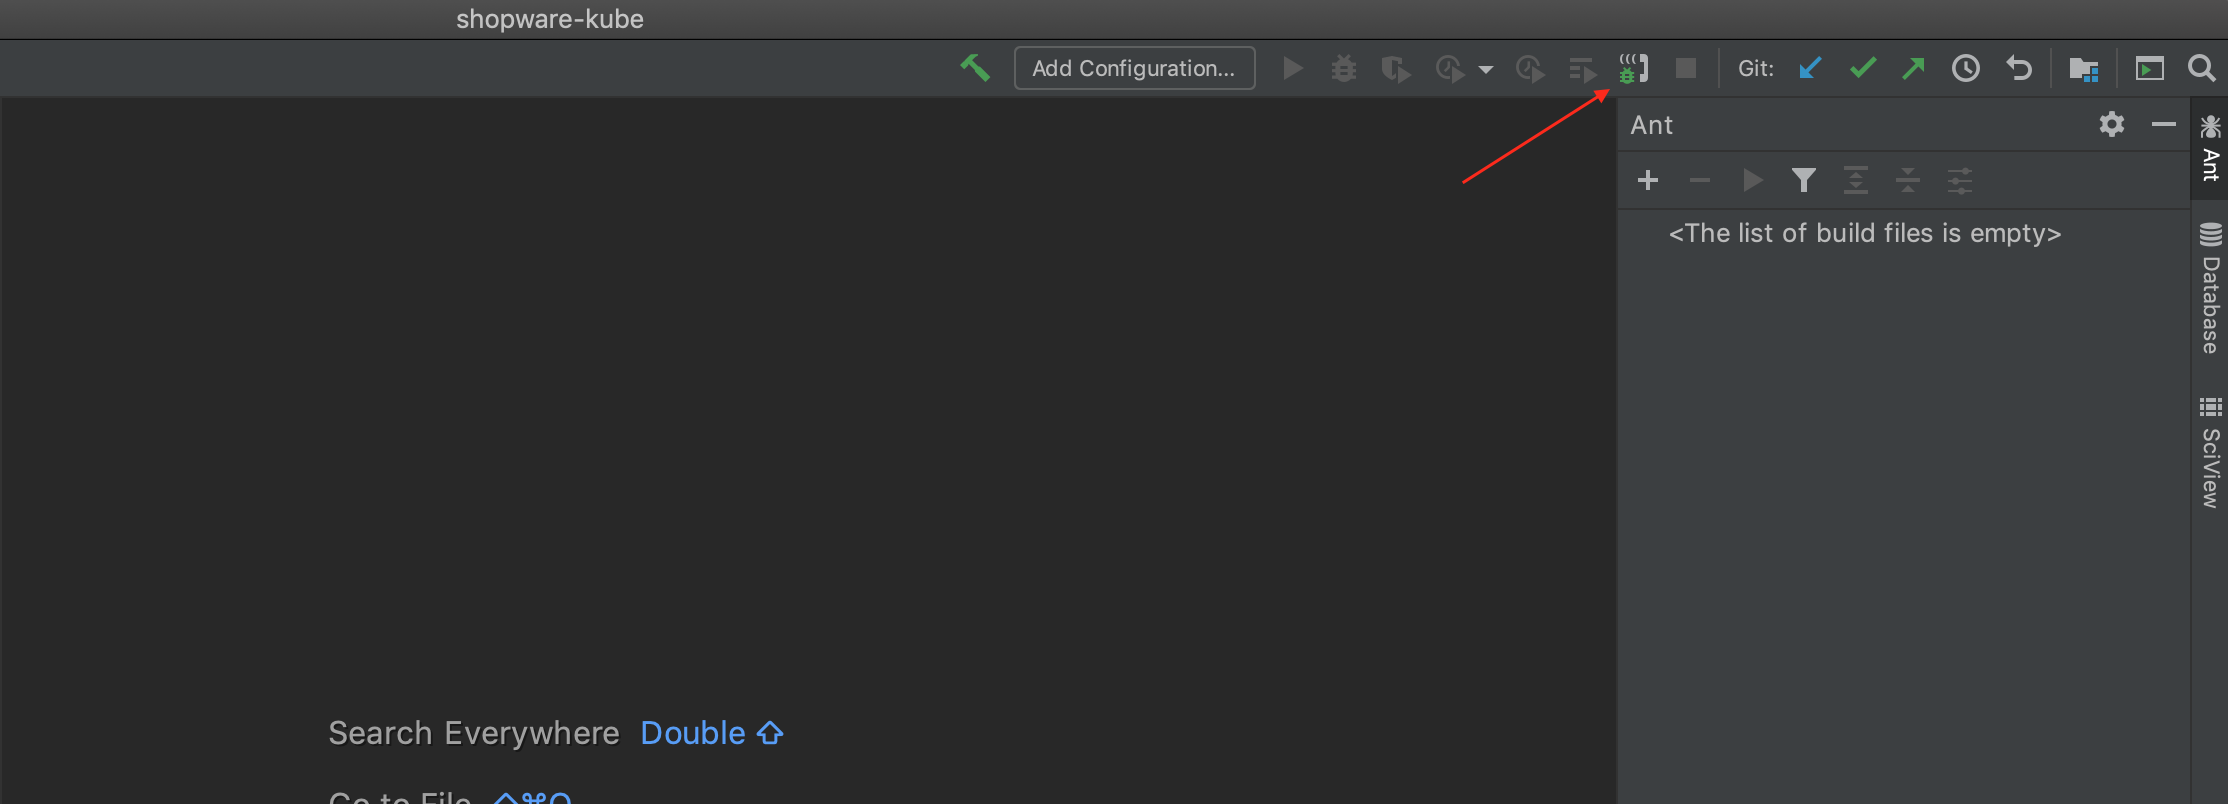
[done] √ Reverse port forwarding started at 9003:9003Don't forget to enable debug connection listener in your IDE. For PhpStorm it is:  You are ready to debugging now. Set the breakpoint in the code, and reload the page. It may be necessary also to map the paths between your local project path and the server.
Summary
This project is still in the proof of concept phase. However, it demonstrates already how efficiently Shopware 6 can be developed inside a Kubernetes cluster. I encourage you to test it out. Of course, you are very welcome to contribute too.
Shopware on Kubernetes Webinar
If the topic is interesting for you, here is a recording from the webinar Shopware 6 in the cloud in the Kubernetes cluster.


